Showing posts with label Importing Mails. Show all posts

Sunday, August 19, 2007

Outlook to Gmail-impoting mails

Impoting mails from Outlook to Gmail is probably the most toughest.The reason you cannot direcly impot it. First you need to import it into thunderbird.Then make use of Gmail loader to import it to Gmail. Unless i's really important i dont advice you to do it. This method is aplicable to Microsoft's any Offline mail reader like outlook or outlook express .This works for all new versions of Outlook and any version previous that thunderbird suppors.

Imprting from Outlook to thunderbird


  • Open Thunderbird

  • Select Tools and then select Import 'Select

  • Select Mail

  • Click Next.

  • Highlight Outlook Express.

  • Click Next

  • Finally click Finish.

Now make use of Gmail Loader to import it into Gmail

  • Launch Gmail Loader.
  • Click Configure Your Email File.
  • Select find
  • Locate the Mozilla Thunderbird folder you want to import into Gmail.
  • Click Open.
  • Select "mBox (Netscape, Mozilla, Thunderbird)" under File Type in Gmail Loader.
  • Now select one of the options under message type "Goes to Sent Mail" OR "Goes to Inbox".
  • Type your complete Gmail address in the Address.
  • Finally Click Send to GMail.


download iconGmail Loader(details & download)

download iconMozilla Thunderbird

To import mails from other mails click here

Thursday, August 16, 2007

gExodus- import mails into Gmail

gExodus is a windows tool that allows you to import your emails into your Gmail account. It supports only mbox format used by Mozilla Mail/News, Mozilla Thunderbird, and many other
Unix email applications.
gExodus

gExodus lets you add a word to the subject of the forwarded mail (like "[import]") so it's easy to set up a Gmail filter to handle the old messages as you like. gExodus is a free download, Windows only.The only majaor problem with this is the messages that appear in Gmail aren't dated correctly.

download iconDownload gExodus

Gmail Loader

Google GMail Loader (GML) is tool to import existing emails .Gmail Loader lets you move your old emails to a Gmail account easily and in one swoop.

Messages forwarded by GML either go to Gmail's "Inbox" or to "Sent Mail". GML only supports two mBox formats (Netscape, Mozilla, Thunderbird, Most Other Clients), MailDir (Qmail, others), MMDF (Mutt), MH (NMH), and Babyl (Emacs RMAIL). Gmail Loader supports Windows, Linux, Mac OS X and others with Python and Python Mega Widgets.


GML usually requires you to export and convert your mail to an mbox format file or any other format mentioned above.

download iconDownload GML

Saturday, August 11, 2007

Gmail in Netscape 4/5/6 version

If you want to acess your Gmail in Netscape 6 or 5 or 4 version. then read along.
To do this


  1. Go to Gmail
  2. Click on settings
  3. Visit Forwarding and POP Tab and enable POP feature
  4. Select 'Save changes'

  5. Open Netscape Mail 6.2.

  6. Click 'Edit'

  7. Select 'Mail & Newsgroups Account Settings...'


  8. Select 'New Account.'


  9. Choose 'ISP or email provider'

  10. Click 'Next.'

  11. Enter your name and the Gmail Id (username@gmail.com) .

  12. Click 'Next.'


  13. Select 'POP' and enter 'pop.gmail.com' in the 'Server Name:' field.


  14. Click 'Next'.

  15. Enter 'smtp.gmail.com' in the 'Server Name:' field . Enter your Gmail id in the 'User Name:' field.


  16. Select 'Always' under 'Use secure connection (SSL):'.
  17. Click 'OK.'
  18. Enter a name for your Netscape Mail account in the 'Account Name:' field.
  19. Click 'Next.' (twice)
  20. Click 'Finish.'


If you get an error message indicating that you cannot connect to pop.gmail.com. Just click 'OK,' and do the following changes.


  • Open the 'Edit' menu.

  • Select 'Mail and Newsgroups Account Settings.'

  • Check the box next to 'Use secure connection (SSL)' (the port changes to 995).

  • Change 'Use secure connection' to 'TLS' under 'Outgoing Server (SMTP).'

  • Click 'OK.'

To use in Netscape Mail 4.5, 4.6, or 4.7
  1. Click 'Edit.'

  2. Select 'Preferences.'

  3. Open 'Mail & Newsgroups.'

  4. Click 'Mail Servers.'

  5. Enter 'smtp.gmail.com' in the 'Outgoing mail (SMTP) server:' field.

  6. Enter your Gmail id (USERNAME @gmail.com) in the 'Outgoing mail server user name:' field.

  7. Select 'Always' under 'Use Secure Socket Layer (SSL) or TLS for outgoing messages:.'

  8. Click Ok

  9. Click 'Add.' to add a new POP Server.

  10. Enter 'pop.gmail.com' in the 'Server Name:' field
  11. Select 'POP 3 Server' as the 'Server Type.'
  12. Enter your Gmail ID .

  13. Click Ok

  14. Click 'Identity' in left column.
  15. Enter your name , Gmail ID .

  16. Enter your email address in the 'Reply-to Address:' field.

  17. Click OK

To read Mails in Other clients click here
Gmail in Thunderbird

If you want to acess your Gmail in Thunderbird then read along.
To do this

  • Go to Gmail
  • Click on settings
  • Visit Forwarding and POP Tab and enable POP feature
  • Select 'Save changes'
  • Open Thunderbird.
  • Select 'Account Settings' from the 'Tools' menu.
  • Select 'Email account,' and click 'Next.'
  • Enter your details and click 'Next.'
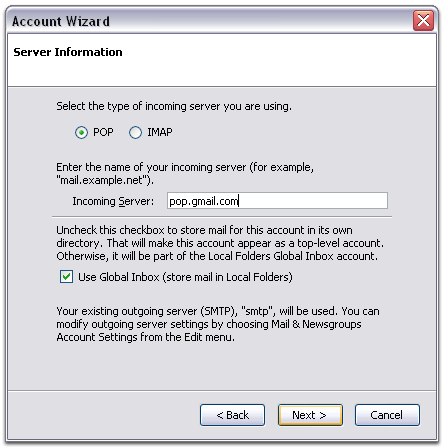
  • Select 'POP' as the type of incoming server you are using. Enter 'pop.gmail.com' in the 'Incoming Server:' field, and click 'Next.'


  • Enter your Gmail username (including '@gmail.com') in the 'User Name:' field, and click 'Next.'
  • Enter a name for your email account in the 'Account Name:' field, and click 'Next.'
  • Verify your account information in the dialogue box, and click 'Finish.'
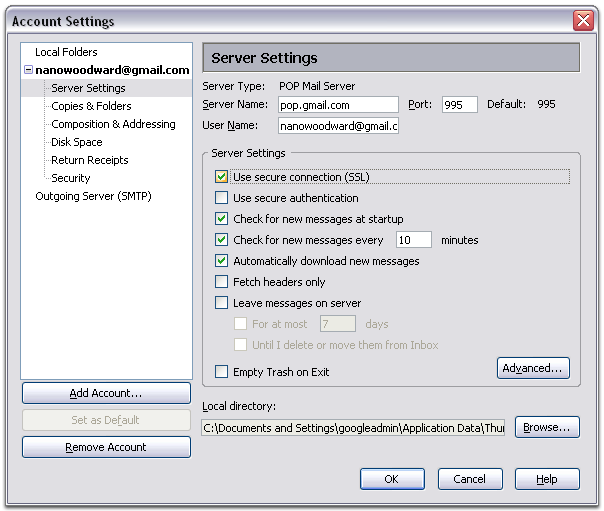
  • Select 'Server Settings' listed beneath your new account.
  • Check the box next to 'Use secure connection (SSL),' and ensure that '995' appears in the 'Port:' field.


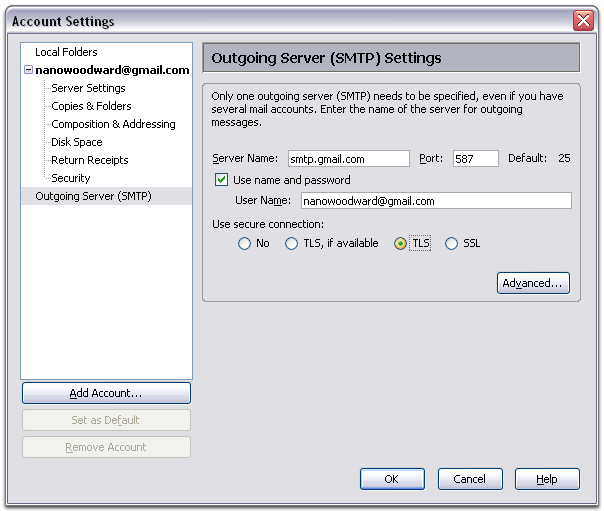
  • Select 'Outgoing Server (SMTP)' listed beneath your new account.
  • Enter 'smtp.gmail.com' in the 'Server Name:' field under 'Outgoing Server (SMTP) Settings,' and enter '587' in the 'Port:' field.


  • Check the box next to 'Use name and password,' and enter your Gmail username (including '@gmail.com') in the 'User Name:' field.
  • Select 'TLS' under 'Use secure connection,' and click 'OK.'
  • Verify that the information listed under 'Congratulations!' is correct, and click 'Finish.'


  • To read mails in other clientclick here


    Gmail In Eduora(Mac)

    If you want to acess your Gmail in Eduora ina Mac computer then read along.To do this


    1. Go to Gmail
    2. Click on settings
    3. Visit Forwarding and POP Tab and enable POP feature
    4. Select 'Save changes'
    5. Open Eudora.
    6. Click the Special menu
    7. Select Settings.
    8. Click the Getting Started icon in the Options window.

      • Enter your full Gmail email address (username@gmail.com) in the Username field.
      • Enter pop.gmail.com in the Mail Server: field.
      • Enter smtp.gmail.com in the SMTP Server: field.

    9. Click Sending mail in the Options window.
    10. check the box next to Allow authorization.
    11. Click the SSL box to select the personality you just created.
    12. Enter the following settings:

      • SSL for POP: Required (Alternate Port)
      • SSL for SMTP: Required (Alternate Port)

    13. Select TLS 1.0 for SSL negotiation.
    14. Click OK.


      To read mails in other clientclick here


      Gmail In Eduora 5.1+ light

      If you want to acess your Gmail in Eduora 5.1+ light version. then read along.
      To do this


      1. Go to Gmail
      2. Click on settings
      3. Visit Forwarding and POP Tab and enable POP feature
      4. Select 'Save changes'
      5. Open Eudra
      6. Click Tools and Options.
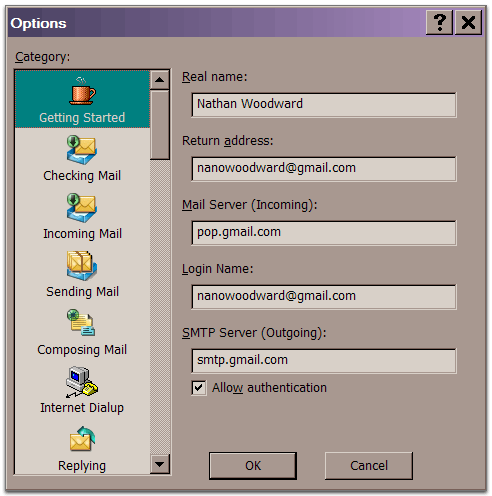
      7. Click Getting Started from the Category list.


        • Enter your full name in the Real name field.
        • Enter your full Gmail email address (username@gmail.com) in the Return address field.
        • Enter pop.gmail.com in the Mail Server (Incoming) field.
        • Enter your Gmail username (username@gmail.com) in the Login Name field.
        • Set the SMTP Server (Outgoing) to smtp.gmail.com and select Allow authentication.


      8. Select Checking Mail from the Category list.


        • Your information should be prepopulated based on your Getting Started settings.
        • Set Secure Sockets when Receiving to Required, Alternate Port.


      9. Select Incoming Mail from the Category list.


        • Ensure that the Leave mail on server and Skip messages over 40K in size options are not checked.
        • Select Passwords for Authentication Style.


      10. Select Sending Mail from the Category list.

        • Check the box next to Allow authentication.
        • Set Secure Sockets when Sending to Required, Alternate Port and click OK.


      11. Click OK
      12. Verify your settings by clicking File > Check Mail.


      To read mails in other client click here

      Gmail In Eduora paid version

      If you want to acess your Gmail in Eudora then read along.

      To do this

      1. Go to Gmail
      2. Click on settings
      3. Visit Forwarding and POP Tab and enable POP feature
      4. Click on svae changes
      5. Open Eudora.
      6. Click Tools > Personalities
      7. Right-click in the Personalities box and select New.
      8. Follow the instructions in the New Account Wizard, using the following settings:


        • Personality Name: Enter an account name and click Next.
        • Account Settings: select Create a brand new email account and click Next.
        • Personal Information: Enter your name as you would like it to appear in the From field of your messages. Click Next.
        • Email Address: Enter your full Gmail email address (username@gmail.com) in the Email Address field, and click Next.
        • Login Name: Enter your Gmail username (username@gmail.com) in the Login Name field, and click Next.
        • Incoming Email Server: Enter pop.gmail.com in the Incoming field. Select the POP radio button and click Next.
        • Outgoing Email Server: enter smtp.gmail.com in the Outgoing field.
          Select Allow authentication and click Next.

      9. Click Finish.
      10. Right-click on the personality you just created
      11. select Properties.


      12. Click the Incoming Mail tab.
      13. Set Secure Sockets when Sending to Required, Alternate Port.


      14. Click OK.

      Now you can access Your gmail
      To read mails in other clientclick here


      Gmail in Entourage

      If you want to acess your Gmail in Entourage then read along.

      To do this


      1. Go to Gmail
      2. Click on settings
      3. Visit Forwarding and POP Tab and enable POP feature
      4. Click "Save Changes"

      For Entourage 2004.

      • Click 'Tools,'
      • Select 'Accounts'
      • Click 'New.'
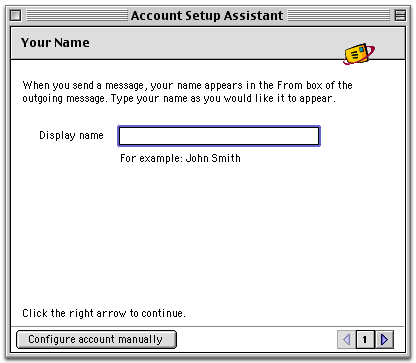
      • If you receive the 'Account Setup Assistant,' click 'Configure account manually.'
      • Select 'POP' next to 'Account type:,' and click 'OK.'
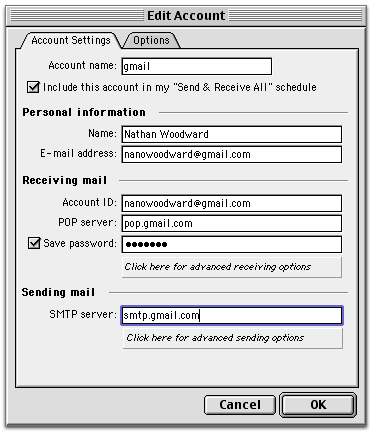
      • Enter a name for your new account in the 'Account Name:' field.
      • Enter your full name in the 'Your Name:' field.
      • Enter your full Gmail email address (username@gmail.com) in the 'Email Address:' and 'Account ID' field.
      • Enter 'pop.gmail.com' in the 'Incoming Mail Server:' field.
      • Click 'Click here for advanced receiving options' in the 'Receiving mail' section.


      • Check 'This POP service requires a secure connection (SSL).'
      • Enter your Gmail password in the 'Your Password:' field.
      • Enter 'smtp.gmail.com' in the 'Outgoing Mail Server:' field.
      • Click 'Click here for advanced sending options' in the 'Sending mail' section.


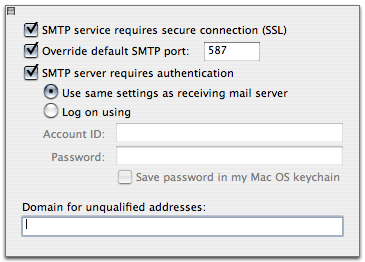
      • Check 'SMTP service requires secure connection (SSL).'
      • Check 'Override default SMTP port:,' and enter '587' in the box.
      • Check 'SMTP server requires authentication,' and click 'OK.'

      For Entourage x.

      • Click 'Tools,'
      • Select 'Account Settings.'
      • Click 'New.'
      • If you receive the 'Account Setup Assistant,' click 'Configure account manually.'
      • Select 'POP' next to 'Account type:,' and click 'OK.'
      • Enter details
      • Enter your full Gmail email address (username@gmail.com) in the 'Email Address:' and in the 'Account ID' field.
      • Enter 'pop.gmail.com' in the 'Incoming Mail Server:' field.
      • Click 'Click here for advanced receiving options' in the 'Receiving mail' section.
      • Check the box next to 'This POP service requires a secure connection (SSL).'
      • Enter your Gmail password in the 'Your Password:' field.
      • Enter 'smtp.gmail.com' in the 'Outgoing Mail Server:' field.
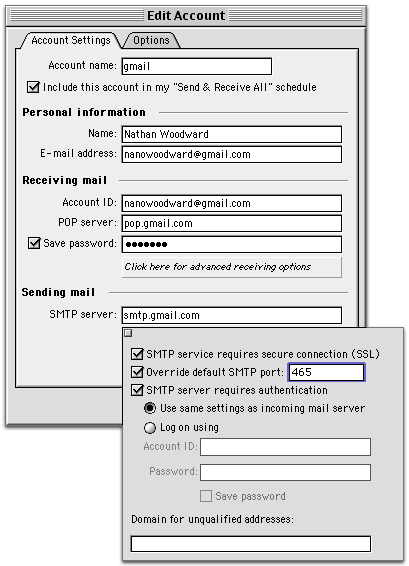
      • Click 'Click here for advanced sending options' in the 'Sending mail' section.
      • Check 'SMTP service requires secure connection (SSL), ' and 'Override default SMTP port:,' and enter '465' in the box.
      • Check 'SMTP server requires authentication,' and click 'OK.'

      Now you can view your Gmail


      To read mails in other clientclick here


      Gmail with outlook express(Mac)

      If you want to acess your Gmail in Outlook express then read along.

      To do this


      1. Go to Gmail
      2. Click on settings
      3. Visit Forwarding and POP Tab and enable POP feature.
      4. Click "Save changes"
      5. Open Outlook(any version).
      6. Click the 'Tools' menu.
      7. Select 'Accounts.'
      8. Open the 'Mail' tab, and click 'New.'
      9. Click 'Mail' in the 'New' menu.
      10. Click 'Configure Account Manually.'


      11. Select 'POP,' and click 'OK.'
      12. Enter your name in the 'Name:' field
      13. Enter your full Gmail email address (username@gmail.com) in the 'Email Address:' and the 'Account ID:' field.
      14. Enter 'pop.gmail.com' in the 'POP server:' field.
      15. Enter your password in the 'Receiving mail password:' field.
      16. Check the box next to 'Save password.'
      17. Enter 'smtp.gmail.com' in the 'SMTP server:' field.
      18. Click 'Click here for advanced receiving options.'


      19. Check the box next to 'This POP service requires a secure connection (SSL).' * The port will change to 995. Close this portion of the dialogue box.
      20. Click 'Check here for advanced sending options.'
      21. Check the box next to 'SMTP service requires secure connection (SSL).'
      22. Check the box next to 'Override default SMTP port,' and enter '465' in the 'Port:' field.
      23. Check the box next to 'SMTP server requires authentication.'
      24. Leave the default 'Use same settings as incoming mail server' button


        selected.
      25. Close this portion of the dialogue box, and then close the configuration dialogue box.
      Now you can read all your mails offline

      To read mails in other clientclick here

      Gmail with outlook express(WIN)

      If you want to acess your Gmail in Outlook express windows edition then read along.

      To do this

      1. Go to Gmail
      2. Click on settings
      3. Visit Forwarding and POP Tab and enable POP feature.
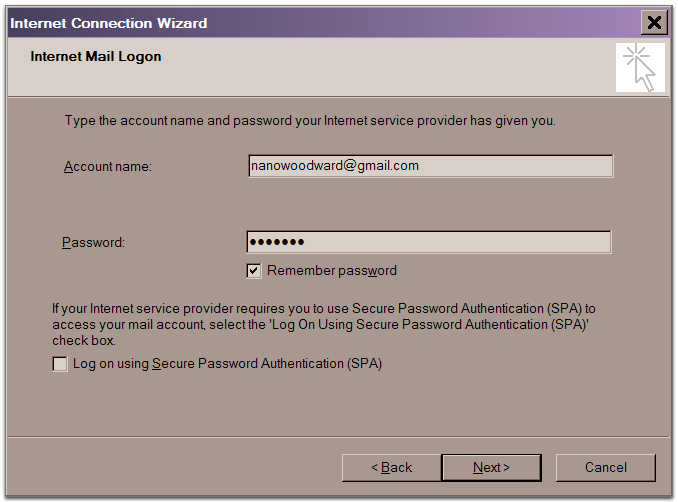
      4. Open Outlook or Outlook Express.
      5. Click the 'Tools' menu,
      6. Select 'Accounts...'
      7. Click 'Add,'
      8. Click 'Mail...'
      9. Enter your name in the 'Display name:' field, & click 'Next.'
      10. Enter your full Gmail email address (username@gmail.com) in the 'Email address:' field, and click 'Next.'
      11. Enter 'pop.gmail.com' in the 'Incoming mail (POP3, IMAP or HTTP) server:' field. Enter 'smtp.gmail.com' in the 'Outgoing mail (SMTP) server:' field.
      12. Click 'Next.'
      13. Enter your Gmail username (including '@gmail.com') in the 'Account name:' field.
      14. Enter your Gmail password in the 'Password:' field, and click 'Next.'


      15. Click 'Finish.'
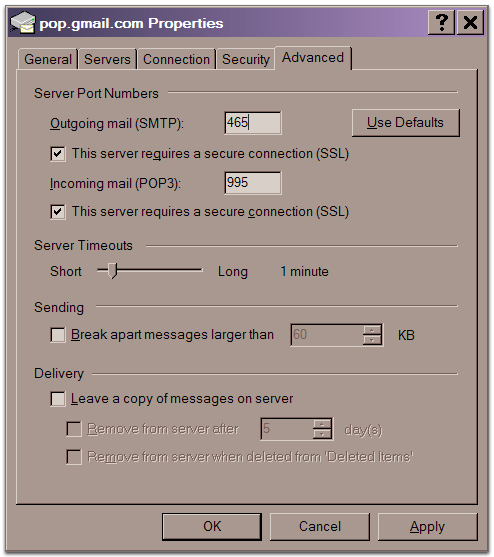
      16. Highlight 'pop.gmail.com' under 'Account'.
      17. Click 'Properties.'
      18. Click the 'Advanced' tab.
      19. Check the box next to 'This server requires a secure connection (SSL)' under 'Outgoing Mail (SMTP).'
      20. Enter '465' in the 'Outgoing mail (SMTP):' field.
      21. Check the box next to 'This server requires a secure connection (SSL)' under 'Incoming mail (POP3).' The port will change to 995.

        *The order of 'Outgoing' and 'Incoming' mail server fields varies by version. Make sure you enter the correct information in each field.


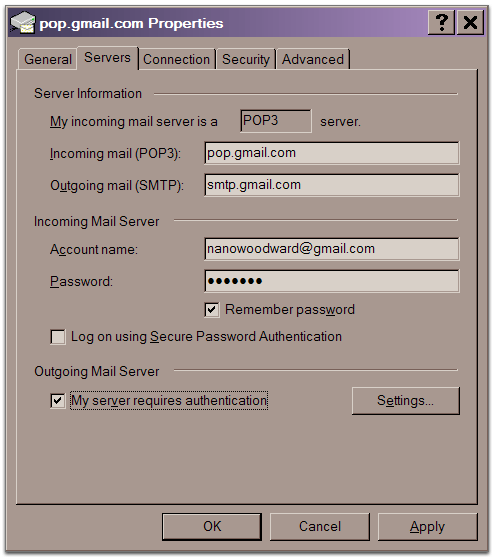
      22. Click the 'Servers' tab,
      23. Check 'My server requires authentication.'


      24. Click 'OK.'


      Congratulations! You're done configuring your client to send and retrieve Gmail messages.


      To read mails in other clientclick here